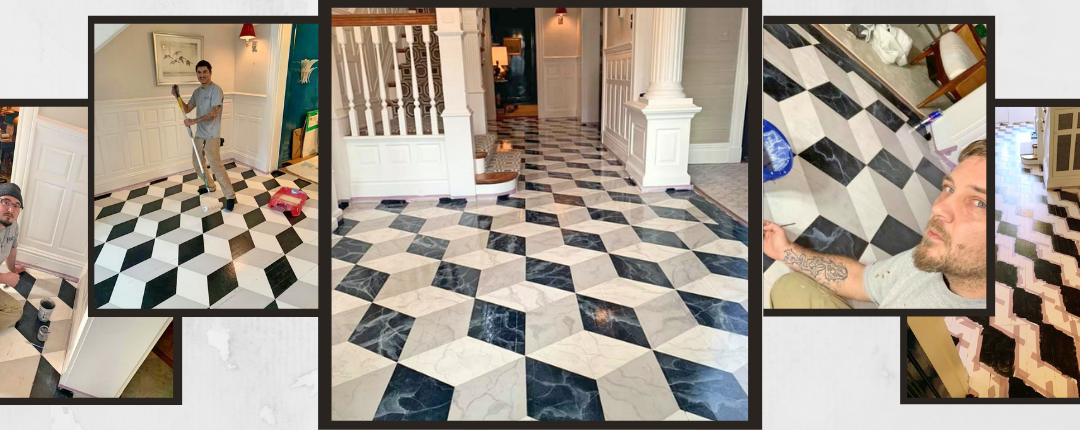
A recent floor project gave the H.J. Holtz & Son decorative painting team a chance to have some fun as they executed a complicated faux marble floor design.
The repeat customer, a design professional, approached Brian Smith, Logan Porter and Eli Smith with a vision of a faux marble floor that would transform the worn wood flooring in his entryway.
The three were happy to jump in.
“The floors were super old with lots of cracks and imperfections – a basic wood floor in an old historic home,” says Brian Smith. “The main reason he wanted the painted design is because the floor has been sanded down so many times, you don’t have much left to sand.”
The key to any painted floor project, but especially one as precise as the homeowner envisioned, is careful preparation, Smith says. That began with the homeowner presenting the Holtz team with several ideas, all centered on a 3D marble effect. From there, the team created 4’-by-4’ board samples, painted just as they would be on the floor itself.
The sample boards featured different color combinations and patterns, and were transported to the home so they could be seen in situ, against the existing paint, wallpaper and furnishings.
“[The homeowner] gave us an idea of colors based on what he had in the house,” Smith says, “because you have to make sure it matches before you get started painting.”
There also had to be agreement on the size of the pattern, Smith says, noting that small patterns can be busy but a big pattern can’t always be seen clearly in a small room. “If you have a bigger space, you want a bigger pattern,” he says.
Physical factors also play a role; interruptions such as doorways, staircases and vents all have to be accounted for, as well as any irregularities. Oftentimes, Smith says, homeowners want the pattern to fit corner to corner. “In that case, you have to measure the room and base the pattern on the dimensions of the room,” he notes. “There are always areas where you have to fudge it. Nothing is a perfect square or rectangle. You have to work the pattern around the space.”
Once finalized, the pattern is laid out on the floor using purple tape – which is less sticky than painter’s blue tape. For this design, each block has three square faces, with multiple layers of paint creating the desired effect of different slabs of veined marble. Smith says most homeowners don’t realize that this type of painting project isn’t a simple, one-day job. “We have to take it in steps, switch up where we work,” he says. “You have to move yourself around so it looks natural and organic.”
The painting of the veins is especially delicate, he notes, adding that he enjoys that step. “For me, it’s relaxing; I’ve been doing it a long time,” he says.
Last but not least, several clear finishing coats are applied, to protect the surface.
“At first [the homeowner] wanted a glossy finish, to match the look of real marble,” Smith says. “But we put a coat on and he saw how glossy it was, so we topped it with satin instead.
“It’s got just enough flair.”